> ## Documentation Index
> Fetch the complete documentation index at: https://docs.framelink.ai/llms.txt
> Use this file to discover all available pages before exploring further.
# Quickstart
> Connect Figma to your coding agent, then build something from a real design. Setup takes about five minutes by hand, or one paste if you let your agent do it.
## Let your agent set it up
The fastest way to get started: copy this prompt into your coding agent. It walks through creating a Figma token and adding the server, and stops at the two steps you need to do yourself — signing in to Figma and copying the token.
```text Setup prompt wrap expandable theme={null}
Set up the Framelink MCP for Figma server for me. Work through these steps in order and stop where I need to act.
1. Open https://www.figma.com in a browser. If Figma asks for credentials, stop and let me sign in myself. Do not type them for me.
2. From the file browser, click the account menu in the top left and choose "Settings". Open the Security tab and scroll to "Personal access tokens". Click "Generate new token".
3. Name the token "Framelink MCP" and set an expiration. Then tick exactly these scopes:
current_user:read
file_comments:read
file_comments:write
file_content:read
file_metadata:read
file_versions:read
library_assets:read
library_content:read
team_library_content:read
file_dev_resources:read
file_dev_resources:write
4. Click "Generate token", then stop. Figma shows the token once and I'll copy it myself — don't read it out of the page. Tell me you're waiting, and I'll paste it back to you.
5. Once I give you the token, add the MCP server to whichever harness you are running in right now. Look up that harness's own MCP configuration format and file location rather than guessing; if you aren't sure which harness you're in, ask me. The server is:
command: npx
args: -y figma-developer-mcp --figma-api-key=YOUR-KEY --stdio
Replace YOUR-KEY with the token I gave you.
On Windows, npx is a batch file that most MCP clients can't launch directly. Use "cmd" as the command and put "/c", "npx" at the front of the args instead.
Give the server the name Framelink_Figma_MCP. If a config file already has an entry for it, update that entry instead of adding a second one.
6. Reload your MCP servers (restart if that's what your harness needs) and confirm the Framelink tools are available. If they aren't, read the server's startup output and tell me what failed.
7. Tell me you're ready, and I'll send you a Figma link to build from.
```
## Get a Figma access token
From the home page in Figma, click your profile icon in the top left corner, then choose **Settings**.
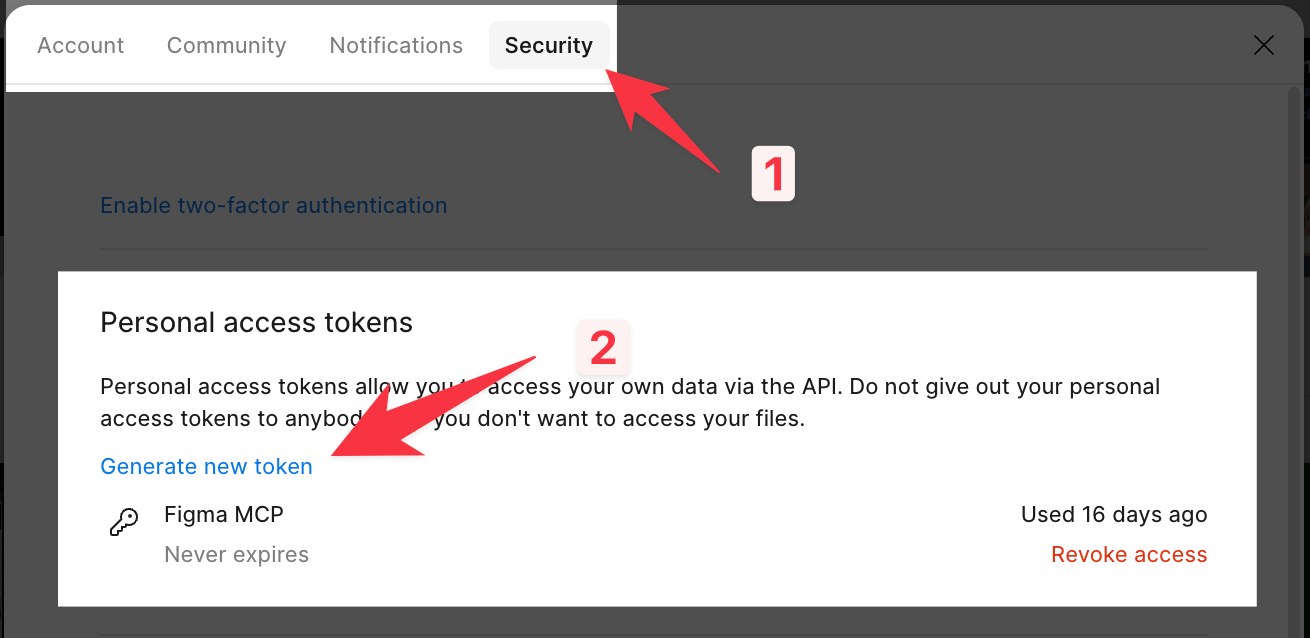
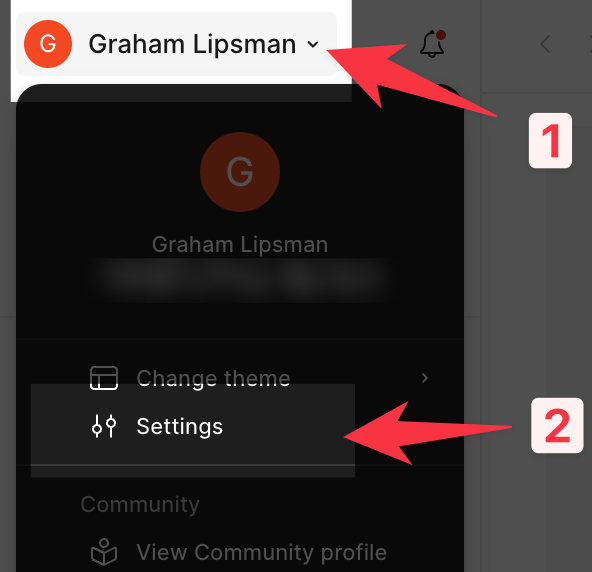 In the settings dialog, switch to the **Security** tab, scroll down to **Personal access tokens**, and click **Generate new token**.
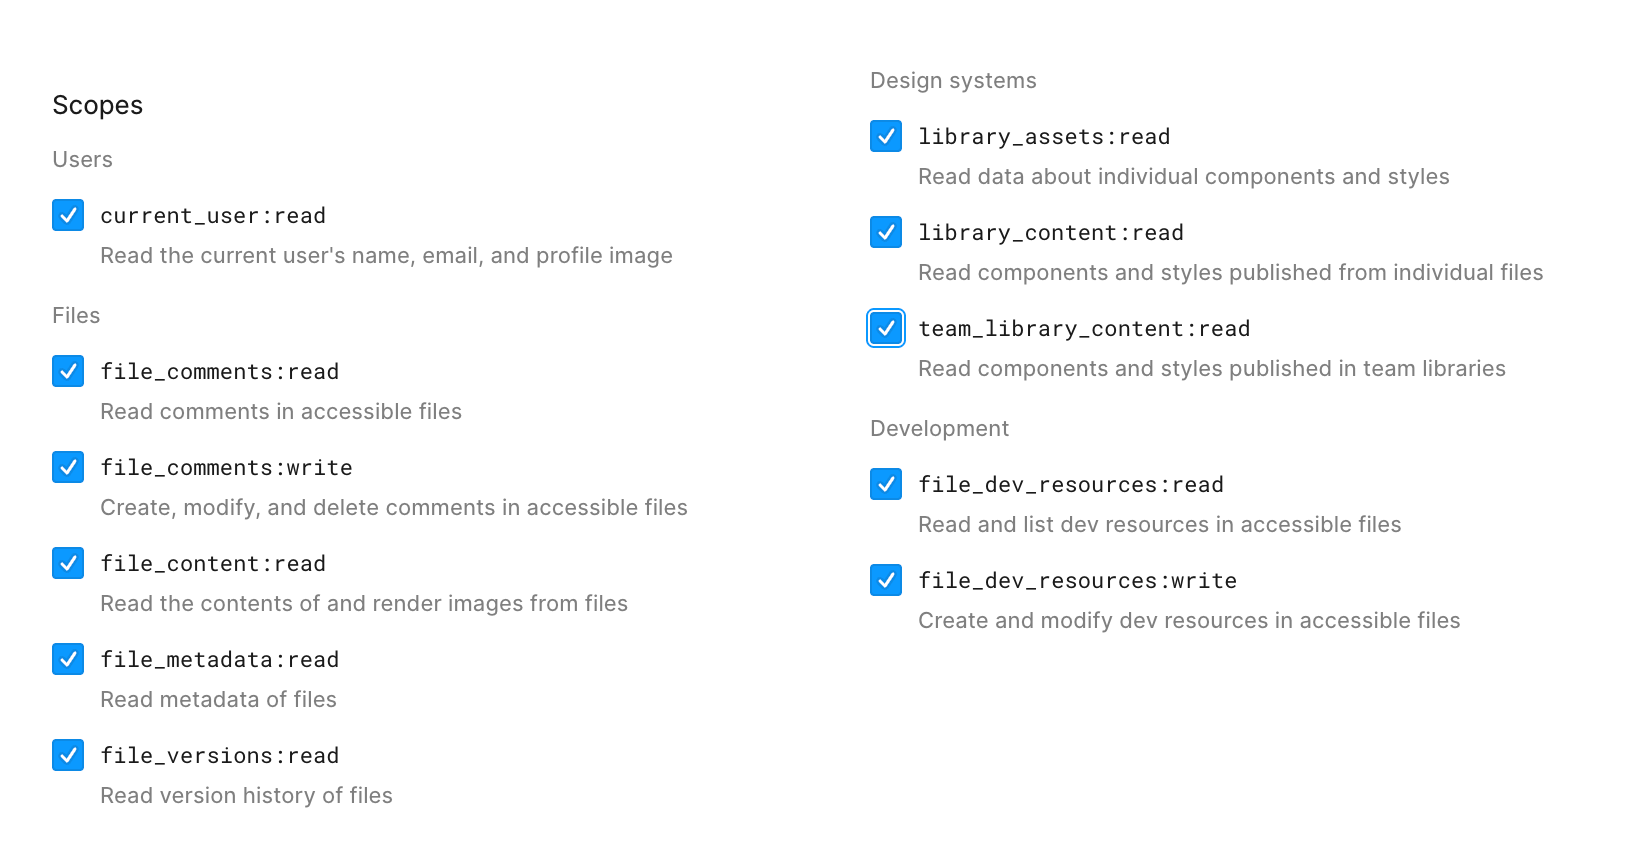
 Give the token a name, set an expiration, then **check every scope shown below** before clicking
 Generate token. Figma tokens are scoped, and a token created with the defaults will not have what the MCP needs.
 If you need more detailed instructions, you can find them in [Figma's documentation on access tokens](https://help.figma.com/hc/en-us/articles/8085703771159-Manage-personal-access-tokens).
## Install in your editor or agent
The most common clients are below. For anything else, see [other editors and agents](#other-editors-and-agents).
Run this command in your terminal. See the [Claude Code MCP docs](https://docs.anthropic.com/en/docs/claude-code/mcp) for more info.
```bash theme={null}
claude mcp add Framelink_Figma_MCP -- npx -y figma-developer-mcp --figma-api-key=YOUR-KEY --stdio
```
Go to **Settings** → **Cursor Settings** → **MCP** → **Add new global MCP server**.
Or paste the following into your `~/.cursor/mcp.json` file. You can also install in a specific project by creating `.cursor/mcp.json` in your project folder. See the [Cursor MCP docs](https://docs.cursor.com/context/model-context-protocol) for more info.
```json theme={null}
{
"mcpServers": {
"Framelink_Figma_MCP": {
"command": "npx",
"args": ["-y", "figma-developer-mcp", "--figma-api-key=YOUR-KEY", "--stdio"]
}
}
}
```
Add this to your Antigravity MCP config file. See the [Antigravity MCP docs](https://antigravity.google/docs/mcp) for more info.
```json theme={null}
{
"mcpServers": {
"Framelink_Figma_MCP": {
"command": "npx",
"args": ["-y", "figma-developer-mcp", "--figma-api-key=YOUR-KEY", "--stdio"]
}
}
}
```
Add the following to your Codex configuration. See [OpenAI Codex](https://github.com/openai/codex) for more info.
```toml theme={null}
[mcp_servers.Framelink_Figma_MCP]
command = "npx"
args = ["-y", "figma-developer-mcp", "--figma-api-key=YOUR-KEY", "--stdio"]
```
Add this to your OpenCode configuration file. See the [OpenCode MCP docs](https://opencode.ai/docs/mcp-servers) for more info.
```json theme={null}
{
"mcp": {
"Framelink_Figma_MCP": {
"type": "local",
"command": ["npx", "-y", "figma-developer-mcp", "--figma-api-key=YOUR-KEY", "--stdio"],
"enabled": true
}
}
}
```
Use the **Add manually** feature and fill in the JSON configuration. See the [Trae docs](https://docs.trae.ai/ide/model-context-protocol?_lang=en) for more info.
```json theme={null}
{
"mcpServers": {
"Framelink_Figma_MCP": {
"command": "npx",
"args": ["-y", "figma-developer-mcp", "--figma-api-key=YOUR-KEY", "--stdio"]
}
}
}
```
1. Navigate to **Kiro** → **MCP Servers**.
2. Click the **+ Add** button.
3. Paste the configuration:
```json theme={null}
{
"mcpServers": {
"Framelink_Figma_MCP": {
"command": "npx",
"args": ["-y", "figma-developer-mcp", "--figma-api-key=YOUR-KEY", "--stdio"],
"env": {},
"disabled": false,
"autoApprove": []
}
}
}
```
4. Click **Save** to apply.
See the [Kiro MCP docs](https://kiro.dev/docs/mcp/configuration/) for more info.
Add this to your VS Code MCP config file. See the [VS Code MCP docs](https://code.visualstudio.com/docs/copilot/chat/mcp-servers) for more info.
```json theme={null}
"mcp": {
"servers": {
"Framelink_Figma_MCP": {
"type": "stdio",
"command": "npx",
"args": ["-y", "figma-developer-mcp", "--figma-api-key=YOUR-KEY", "--stdio"]
}
}
}
```
Run this command in your terminal, then `/reload` any open Pi session. Requires Pi 0.99 or later. See the [Pi MCP docs](https://github.com/earendil-works/pi/blob/main/packages/coding-agent/docs/mcp.md) for more info.
```bash theme={null}
pi mcp add Framelink_Figma_MCP -- npx -y figma-developer-mcp --figma-api-key=YOUR-KEY --stdio
```
### Other editors and agents
Add this to your Amazon Q Developer CLI configuration file. See the [Amazon Q Developer CLI docs](https://docs.aws.amazon.com/amazonq/latest/qdeveloper-ug/command-line-mcp-configuration.html) for more info.
```json theme={null}
{
"mcpServers": {
"Framelink_Figma_MCP": {
"command": "npx",
"args": ["-y", "figma-developer-mcp", "--figma-api-key=YOUR-KEY", "--stdio"]
}
}
}
```
Run this command in your terminal. See the [Amp MCP docs](https://ampcode.com/manual#mcp) for more info.
```bash theme={null}
amp mcp add Framelink_Figma_MCP -- npx -y figma-developer-mcp --figma-api-key=YOUR-KEY --stdio
```
1. Press `Cmd/Ctrl+Shift+P` or go to the hamburger menu in the Augment panel.
2. Select **Edit Settings**.
3. Under **Advanced**, click **Edit in settings.json**.
4. Add the server configuration to the `mcpServers` array in the `augment.advanced` object:
```json theme={null}
"augment.advanced": {
"mcpServers": [
{
"name": "Framelink_Figma_MCP",
"command": "npx",
"args": ["-y", "figma-developer-mcp", "--figma-api-key=YOUR-KEY", "--stdio"]
}
]
}
```
Open **Settings**, navigate to **Plugins**, and enter the following configuration. See [BoltAI's documentation](https://docs.boltai.com/docs/plugins/mcp-servers) for more info.
```json theme={null}
{
"mcpServers": {
"Framelink_Figma_MCP": {
"command": "npx",
"args": ["-y", "figma-developer-mcp", "--figma-api-key=YOUR-KEY", "--stdio"]
}
}
}
```
Open Claude Desktop, go to **Settings**, then **Developer**, and edit your `claude_desktop_config.json` file. See the [Claude Desktop MCP docs](https://modelcontextprotocol.io/quickstart/user) for more info.
```json theme={null}
{
"mcpServers": {
"Framelink_Figma_MCP": {
"command": "npx",
"args": ["-y", "figma-developer-mcp", "--figma-api-key=YOUR-KEY", "--stdio"]
}
}
}
```
1. Open **Cline** in VS Code.
2. Click the hamburger menu icon to enter the **MCP Servers** section.
3. Choose the **Installed** tab.
4. Click **Edit Configuration** and add the following:
```json theme={null}
{
"mcpServers": {
"Framelink_Figma_MCP": {
"command": "npx",
"args": ["-y", "figma-developer-mcp", "--figma-api-key=YOUR-KEY", "--stdio"]
}
}
}
```
See the [Cline MCP docs](https://docs.cline.bot/mcp/mcp-overview) for more info.
Open `~/.copilot/mcp-config.json` and add the following configuration:
```json theme={null}
{
"mcpServers": {
"Framelink_Figma_MCP": {
"type": "local",
"command": "npx",
"args": ["-y", "figma-developer-mcp", "--figma-api-key=YOUR-KEY", "--stdio"]
}
}
}
```
Add the following configuration to **Repository** → **Settings** → **Copilot** → **Coding agent** → **MCP configuration**. See the [GitHub Copilot coding agent docs](https://docs.github.com/en/enterprise-cloud@latest/copilot/how-tos/agents/copilot-coding-agent/extending-copilot-coding-agent-with-mcp) for more info.
```json theme={null}
{
"mcpServers": {
"Framelink_Figma_MCP": {
"command": "npx",
"args": ["-y", "figma-developer-mcp", "--figma-api-key=YOUR-KEY", "--stdio"]
}
}
}
```
Add this to your Crush configuration file. See the [Crush MCP docs](https://github.com/charmbracelet/crush#mcps) for more info.
```json theme={null}
{
"$schema": "https://charm.land/crush.json",
"mcp": {
"Framelink_Figma_MCP": {
"type": "stdio",
"command": "npx",
"args": ["-y", "figma-developer-mcp", "--figma-api-key=YOUR-KEY", "--stdio"]
}
}
}
```
[Emdash](https://github.com/generalaction/emdash) is an orchestration layer for running multiple coding agents in parallel. Emdash does not modify your agent's config directly — you still need to configure your coding agent (Codex, Claude Code, Cursor, etc.) to connect to Framelink MCP for Figma using the instructions for that specific agent on this page.
See the [Emdash repository](https://github.com/generalaction/emdash) for more information.
Factory's droid supports MCP servers through its CLI. See the [Factory MCP docs](https://docs.factory.ai/cli/configuration/mcp) for more info.
```bash theme={null}
droid mcp add Framelink_Figma_MCP "npx -y figma-developer-mcp --figma-api-key=YOUR-KEY --stdio"
```
Open the Gemini CLI settings file at `~/.gemini/settings.json` and add the following to the `mcpServers` object. See the [Gemini CLI docs](https://google-gemini.github.io/gemini-cli/docs/tools/mcp-server.html) for more info.
```json theme={null}
{
"mcpServers": {
"Framelink_Figma_MCP": {
"command": "npx",
"args": ["-y", "figma-developer-mcp", "--figma-api-key=YOUR-KEY", "--stdio"]
}
}
}
```
1. In any JetBrains IDE, go to **Settings** → **Tools** → **AI Assistant** → **Model Context Protocol (MCP)**.
2. Click **+ Add**.
3. Click on **Command** in the top-left corner and select the **As JSON** option.
4. Add this configuration:
```json theme={null}
{
"mcpServers": {
"Framelink_Figma_MCP": {
"command": "npx",
"args": ["-y", "figma-developer-mcp", "--figma-api-key=YOUR-KEY", "--stdio"]
}
}
}
```
5. Click **Apply** to save changes.
See the [JetBrains AI Assistant docs](https://www.jetbrains.com/help/ai-assistant/configure-an-mcp-server.html) for more info.
Create `.kilocode/mcp.json` in your project directory with the following configuration:
```json theme={null}
{
"mcpServers": {
"Framelink_Figma_MCP": {
"command": "npx",
"args": ["-y", "figma-developer-mcp", "--figma-api-key=YOUR-KEY", "--stdio"]
}
}
}
```
You can also configure it via the Kilo Code UI under **Settings** → **MCP Servers** → **Add Server**.
1. Navigate to **Program** (right side) → **Install** → **Edit mcp.json**.
2. Paste the configuration:
```json theme={null}
{
"mcpServers": {
"Framelink_Figma_MCP": {
"command": "npx",
"args": ["-y", "figma-developer-mcp", "--figma-api-key=YOUR-KEY", "--stdio"]
}
}
}
```
3. Click **Save**.
See [LM Studio MCP support](https://lmstudio.ai/blog/lmstudio-v0.3.17) for more info.
1. Navigate to **Perplexity** → **Settings**.
2. Select **Connectors**.
3. Click **Add Connector**.
4. Select **Advanced**.
5. Enter Server Name: `Framelink_Figma_MCP`
6. Paste the configuration:
```json theme={null}
{
"args": ["-y", "figma-developer-mcp", "--figma-api-key=YOUR-KEY", "--stdio"],
"command": "npx",
"env": {}
}
```
7. Click **Save**.
See [Perplexity's MCP documentation](https://www.perplexity.ai/help-center/en/articles/11502712-local-and-remote-mcps-for-perplexity) for more info.
1. Open the Qodo Gen chat panel in VS Code or IntelliJ.
2. Click **Connect more tools**.
3. Click **+ Add new MCP**.
4. Add the configuration:
```json theme={null}
{
"mcpServers": {
"Framelink_Figma_MCP": {
"command": "npx",
"args": ["-y", "figma-developer-mcp", "--figma-api-key=YOUR-KEY", "--stdio"]
}
}
}
```
See the [Qodo Gen docs](https://docs.qodo.ai/qodo-documentation/qodo-gen/qodo-gen-chat/agentic-mode/agentic-tools-mcps) for more info.
You can use the CLI or add the config manually. See the [Qwen Code MCP docs](https://qwenlm.github.io/qwen-code-docs/en/users/features/mcp/) for more info.
**CLI**
```bash theme={null}
qwen mcp add Framelink_Figma_MCP npx -y figma-developer-mcp --figma-api-key=YOUR-KEY --stdio
```
**Manual Configuration**
Open `~/.qwen/settings.json` (user scope) or `.qwen/settings.json` (project scope) and add:
```json theme={null}
{
"mcpServers": {
"Framelink_Figma_MCP": {
"command": "npx",
"args": ["-y", "figma-developer-mcp", "--figma-api-key=YOUR-KEY", "--stdio"]
}
}
}
```
Add this to your Roo Code MCP configuration file. See the [Roo Code MCP docs](https://docs.roocode.com/features/mcp/using-mcp-in-roo) for more info.
```json theme={null}
{
"mcpServers": {
"Framelink_Figma_MCP": {
"command": "npx",
"args": ["-y", "figma-developer-mcp", "--figma-api-key=YOUR-KEY", "--stdio"]
}
}
}
```
Edit your Rovo Dev CLI MCP config:
```bash theme={null}
acli rovodev mcp
```
Then add the following:
```json theme={null}
{
"mcpServers": {
"Framelink_Figma_MCP": {
"command": "npx",
"args": ["-y", "figma-developer-mcp", "--figma-api-key=YOUR-KEY", "--stdio"]
}
}
}
```
Add this to your Visual Studio MCP configuration. See the [Visual Studio MCP docs](https://learn.microsoft.com/visualstudio/ide/mcp-servers?view=vs-2022) for more info.
```json theme={null}
{
"mcp": {
"servers": {
"Framelink_Figma_MCP": {
"type": "stdio",
"command": "npx",
"args": ["-y", "figma-developer-mcp", "--figma-api-key=YOUR-KEY", "--stdio"]
}
}
}
}
```
1. Navigate to **Settings** → **AI** → **Manage MCP servers**.
2. Click the **+ Add** button.
3. Paste the configuration:
```json theme={null}
{
"Framelink_Figma_MCP": {
"command": "npx",
"args": ["-y", "figma-developer-mcp", "--figma-api-key=YOUR-KEY", "--stdio"],
"env": {},
"working_directory": null,
"start_on_launch": true
}
}
```
4. Click **Save**.
See the [Warp MCP docs](https://docs.warp.dev/knowledge-and-collaboration/mcp#adding-an-mcp-server) for more info.
Add this to your Windsurf MCP config file. See the [Windsurf MCP docs](https://docs.windsurf.com/windsurf/cascade/mcp) for more info.
```json theme={null}
{
"mcpServers": {
"Framelink_Figma_MCP": {
"command": "npx",
"args": ["-y", "figma-developer-mcp", "--figma-api-key=YOUR-KEY", "--stdio"]
}
}
}
```
Add this to your Zed `settings.json`. See the [Zed Context Server docs](https://zed.dev/docs/assistant/context-servers) for more info.
```json theme={null}
{
"context_servers": {
"Framelink_Figma_MCP": {
"source": "custom",
"command": "npx",
"args": ["-y", "figma-developer-mcp", "--figma-api-key=YOUR-KEY", "--stdio"]
}
}
}
```
1. Go to the Zencoder menu (**...**).
2. Select **Agent tools**.
3. Click **Add custom MCP**.
4. Add the name and configuration:
```json theme={null}
{
"command": "npx",
"args": ["-y", "figma-developer-mcp", "--figma-api-key=YOUR-KEY", "--stdio"]
}
```
5. Click **Install**.
Not listed? Most MCP clients take the same JSON. Check your editor's docs, or [join our Discord](https://discord.gg/MeE3UEjdGN).
### Windows, Bun, and Deno
On Windows, `npx` is a batch file (`npx.cmd`) and cannot be run directly by most MCP clients. Use `cmd` to run `npx` instead. In the JSON configuration above, replace `"command": "npx"` with `"command": "cmd"` and add `"/c", "npx",` to the beginning of the `args` array:
```json theme={null}
{
"mcpServers": {
"Framelink_Figma_MCP": {
"command": "cmd",
"args": ["/c", "npx", "-y", "figma-developer-mcp", "--figma-api-key=YOUR-KEY", "--stdio"]
}
}
}
```
If you prefer an alternative runtime to Node.js, you can use Bun or Deno to run the MCP server. Use these in place of the `npx` command in your editor's config above.
**Bun**
```json theme={null}
{
"mcpServers": {
"Framelink_Figma_MCP": {
"command": "bunx",
"args": ["-y", "figma-developer-mcp", "--figma-api-key=YOUR-KEY", "--stdio"]
}
}
}
```
**Deno**
```json theme={null}
{
"mcpServers": {
"Framelink_Figma_MCP": {
"command": "deno",
"args": [
"run",
"--allow-env",
"--allow-net",
"npm:figma-developer-mcp",
"--figma-api-key=YOUR-KEY",
"--stdio"
]
}
}
}
```
## Implement your first design
After configuring your IDE, you'll be able to pull complete design data from any Figma file.
The MCP server compresses the data it receives from the Figma API by almost 90%. Even still, complex designs can overwhelm AI agents with too much information.
You can try to get your editor to implement a whole design for you, but for the most consistent results, work on one section at a time.
To do that, **right click on the frame or group you'd like to implement, then select
If you need more detailed instructions, you can find them in [Figma's documentation on access tokens](https://help.figma.com/hc/en-us/articles/8085703771159-Manage-personal-access-tokens).
## Install in your editor or agent
The most common clients are below. For anything else, see [other editors and agents](#other-editors-and-agents).
Run this command in your terminal. See the [Claude Code MCP docs](https://docs.anthropic.com/en/docs/claude-code/mcp) for more info.
```bash theme={null}
claude mcp add Framelink_Figma_MCP -- npx -y figma-developer-mcp --figma-api-key=YOUR-KEY --stdio
```
Go to **Settings** → **Cursor Settings** → **MCP** → **Add new global MCP server**.
Or paste the following into your `~/.cursor/mcp.json` file. You can also install in a specific project by creating `.cursor/mcp.json` in your project folder. See the [Cursor MCP docs](https://docs.cursor.com/context/model-context-protocol) for more info.
```json theme={null}
{
"mcpServers": {
"Framelink_Figma_MCP": {
"command": "npx",
"args": ["-y", "figma-developer-mcp", "--figma-api-key=YOUR-KEY", "--stdio"]
}
}
}
```
Add this to your Antigravity MCP config file. See the [Antigravity MCP docs](https://antigravity.google/docs/mcp) for more info.
```json theme={null}
{
"mcpServers": {
"Framelink_Figma_MCP": {
"command": "npx",
"args": ["-y", "figma-developer-mcp", "--figma-api-key=YOUR-KEY", "--stdio"]
}
}
}
```
Add the following to your Codex configuration. See [OpenAI Codex](https://github.com/openai/codex) for more info.
```toml theme={null}
[mcp_servers.Framelink_Figma_MCP]
command = "npx"
args = ["-y", "figma-developer-mcp", "--figma-api-key=YOUR-KEY", "--stdio"]
```
Add this to your OpenCode configuration file. See the [OpenCode MCP docs](https://opencode.ai/docs/mcp-servers) for more info.
```json theme={null}
{
"mcp": {
"Framelink_Figma_MCP": {
"type": "local",
"command": ["npx", "-y", "figma-developer-mcp", "--figma-api-key=YOUR-KEY", "--stdio"],
"enabled": true
}
}
}
```
Use the **Add manually** feature and fill in the JSON configuration. See the [Trae docs](https://docs.trae.ai/ide/model-context-protocol?_lang=en) for more info.
```json theme={null}
{
"mcpServers": {
"Framelink_Figma_MCP": {
"command": "npx",
"args": ["-y", "figma-developer-mcp", "--figma-api-key=YOUR-KEY", "--stdio"]
}
}
}
```
1. Navigate to **Kiro** → **MCP Servers**.
2. Click the **+ Add** button.
3. Paste the configuration:
```json theme={null}
{
"mcpServers": {
"Framelink_Figma_MCP": {
"command": "npx",
"args": ["-y", "figma-developer-mcp", "--figma-api-key=YOUR-KEY", "--stdio"],
"env": {},
"disabled": false,
"autoApprove": []
}
}
}
```
4. Click **Save** to apply.
See the [Kiro MCP docs](https://kiro.dev/docs/mcp/configuration/) for more info.
Add this to your VS Code MCP config file. See the [VS Code MCP docs](https://code.visualstudio.com/docs/copilot/chat/mcp-servers) for more info.
```json theme={null}
"mcp": {
"servers": {
"Framelink_Figma_MCP": {
"type": "stdio",
"command": "npx",
"args": ["-y", "figma-developer-mcp", "--figma-api-key=YOUR-KEY", "--stdio"]
}
}
}
```
Run this command in your terminal, then `/reload` any open Pi session. Requires Pi 0.99 or later. See the [Pi MCP docs](https://github.com/earendil-works/pi/blob/main/packages/coding-agent/docs/mcp.md) for more info.
```bash theme={null}
pi mcp add Framelink_Figma_MCP -- npx -y figma-developer-mcp --figma-api-key=YOUR-KEY --stdio
```
### Other editors and agents
Add this to your Amazon Q Developer CLI configuration file. See the [Amazon Q Developer CLI docs](https://docs.aws.amazon.com/amazonq/latest/qdeveloper-ug/command-line-mcp-configuration.html) for more info.
```json theme={null}
{
"mcpServers": {
"Framelink_Figma_MCP": {
"command": "npx",
"args": ["-y", "figma-developer-mcp", "--figma-api-key=YOUR-KEY", "--stdio"]
}
}
}
```
Run this command in your terminal. See the [Amp MCP docs](https://ampcode.com/manual#mcp) for more info.
```bash theme={null}
amp mcp add Framelink_Figma_MCP -- npx -y figma-developer-mcp --figma-api-key=YOUR-KEY --stdio
```
1. Press `Cmd/Ctrl+Shift+P` or go to the hamburger menu in the Augment panel.
2. Select **Edit Settings**.
3. Under **Advanced**, click **Edit in settings.json**.
4. Add the server configuration to the `mcpServers` array in the `augment.advanced` object:
```json theme={null}
"augment.advanced": {
"mcpServers": [
{
"name": "Framelink_Figma_MCP",
"command": "npx",
"args": ["-y", "figma-developer-mcp", "--figma-api-key=YOUR-KEY", "--stdio"]
}
]
}
```
Open **Settings**, navigate to **Plugins**, and enter the following configuration. See [BoltAI's documentation](https://docs.boltai.com/docs/plugins/mcp-servers) for more info.
```json theme={null}
{
"mcpServers": {
"Framelink_Figma_MCP": {
"command": "npx",
"args": ["-y", "figma-developer-mcp", "--figma-api-key=YOUR-KEY", "--stdio"]
}
}
}
```
Open Claude Desktop, go to **Settings**, then **Developer**, and edit your `claude_desktop_config.json` file. See the [Claude Desktop MCP docs](https://modelcontextprotocol.io/quickstart/user) for more info.
```json theme={null}
{
"mcpServers": {
"Framelink_Figma_MCP": {
"command": "npx",
"args": ["-y", "figma-developer-mcp", "--figma-api-key=YOUR-KEY", "--stdio"]
}
}
}
```
1. Open **Cline** in VS Code.
2. Click the hamburger menu icon to enter the **MCP Servers** section.
3. Choose the **Installed** tab.
4. Click **Edit Configuration** and add the following:
```json theme={null}
{
"mcpServers": {
"Framelink_Figma_MCP": {
"command": "npx",
"args": ["-y", "figma-developer-mcp", "--figma-api-key=YOUR-KEY", "--stdio"]
}
}
}
```
See the [Cline MCP docs](https://docs.cline.bot/mcp/mcp-overview) for more info.
Open `~/.copilot/mcp-config.json` and add the following configuration:
```json theme={null}
{
"mcpServers": {
"Framelink_Figma_MCP": {
"type": "local",
"command": "npx",
"args": ["-y", "figma-developer-mcp", "--figma-api-key=YOUR-KEY", "--stdio"]
}
}
}
```
Add the following configuration to **Repository** → **Settings** → **Copilot** → **Coding agent** → **MCP configuration**. See the [GitHub Copilot coding agent docs](https://docs.github.com/en/enterprise-cloud@latest/copilot/how-tos/agents/copilot-coding-agent/extending-copilot-coding-agent-with-mcp) for more info.
```json theme={null}
{
"mcpServers": {
"Framelink_Figma_MCP": {
"command": "npx",
"args": ["-y", "figma-developer-mcp", "--figma-api-key=YOUR-KEY", "--stdio"]
}
}
}
```
Add this to your Crush configuration file. See the [Crush MCP docs](https://github.com/charmbracelet/crush#mcps) for more info.
```json theme={null}
{
"$schema": "https://charm.land/crush.json",
"mcp": {
"Framelink_Figma_MCP": {
"type": "stdio",
"command": "npx",
"args": ["-y", "figma-developer-mcp", "--figma-api-key=YOUR-KEY", "--stdio"]
}
}
}
```
[Emdash](https://github.com/generalaction/emdash) is an orchestration layer for running multiple coding agents in parallel. Emdash does not modify your agent's config directly — you still need to configure your coding agent (Codex, Claude Code, Cursor, etc.) to connect to Framelink MCP for Figma using the instructions for that specific agent on this page.
See the [Emdash repository](https://github.com/generalaction/emdash) for more information.
Factory's droid supports MCP servers through its CLI. See the [Factory MCP docs](https://docs.factory.ai/cli/configuration/mcp) for more info.
```bash theme={null}
droid mcp add Framelink_Figma_MCP "npx -y figma-developer-mcp --figma-api-key=YOUR-KEY --stdio"
```
Open the Gemini CLI settings file at `~/.gemini/settings.json` and add the following to the `mcpServers` object. See the [Gemini CLI docs](https://google-gemini.github.io/gemini-cli/docs/tools/mcp-server.html) for more info.
```json theme={null}
{
"mcpServers": {
"Framelink_Figma_MCP": {
"command": "npx",
"args": ["-y", "figma-developer-mcp", "--figma-api-key=YOUR-KEY", "--stdio"]
}
}
}
```
1. In any JetBrains IDE, go to **Settings** → **Tools** → **AI Assistant** → **Model Context Protocol (MCP)**.
2. Click **+ Add**.
3. Click on **Command** in the top-left corner and select the **As JSON** option.
4. Add this configuration:
```json theme={null}
{
"mcpServers": {
"Framelink_Figma_MCP": {
"command": "npx",
"args": ["-y", "figma-developer-mcp", "--figma-api-key=YOUR-KEY", "--stdio"]
}
}
}
```
5. Click **Apply** to save changes.
See the [JetBrains AI Assistant docs](https://www.jetbrains.com/help/ai-assistant/configure-an-mcp-server.html) for more info.
Create `.kilocode/mcp.json` in your project directory with the following configuration:
```json theme={null}
{
"mcpServers": {
"Framelink_Figma_MCP": {
"command": "npx",
"args": ["-y", "figma-developer-mcp", "--figma-api-key=YOUR-KEY", "--stdio"]
}
}
}
```
You can also configure it via the Kilo Code UI under **Settings** → **MCP Servers** → **Add Server**.
1. Navigate to **Program** (right side) → **Install** → **Edit mcp.json**.
2. Paste the configuration:
```json theme={null}
{
"mcpServers": {
"Framelink_Figma_MCP": {
"command": "npx",
"args": ["-y", "figma-developer-mcp", "--figma-api-key=YOUR-KEY", "--stdio"]
}
}
}
```
3. Click **Save**.
See [LM Studio MCP support](https://lmstudio.ai/blog/lmstudio-v0.3.17) for more info.
1. Navigate to **Perplexity** → **Settings**.
2. Select **Connectors**.
3. Click **Add Connector**.
4. Select **Advanced**.
5. Enter Server Name: `Framelink_Figma_MCP`
6. Paste the configuration:
```json theme={null}
{
"args": ["-y", "figma-developer-mcp", "--figma-api-key=YOUR-KEY", "--stdio"],
"command": "npx",
"env": {}
}
```
7. Click **Save**.
See [Perplexity's MCP documentation](https://www.perplexity.ai/help-center/en/articles/11502712-local-and-remote-mcps-for-perplexity) for more info.
1. Open the Qodo Gen chat panel in VS Code or IntelliJ.
2. Click **Connect more tools**.
3. Click **+ Add new MCP**.
4. Add the configuration:
```json theme={null}
{
"mcpServers": {
"Framelink_Figma_MCP": {
"command": "npx",
"args": ["-y", "figma-developer-mcp", "--figma-api-key=YOUR-KEY", "--stdio"]
}
}
}
```
See the [Qodo Gen docs](https://docs.qodo.ai/qodo-documentation/qodo-gen/qodo-gen-chat/agentic-mode/agentic-tools-mcps) for more info.
You can use the CLI or add the config manually. See the [Qwen Code MCP docs](https://qwenlm.github.io/qwen-code-docs/en/users/features/mcp/) for more info.
**CLI**
```bash theme={null}
qwen mcp add Framelink_Figma_MCP npx -y figma-developer-mcp --figma-api-key=YOUR-KEY --stdio
```
**Manual Configuration**
Open `~/.qwen/settings.json` (user scope) or `.qwen/settings.json` (project scope) and add:
```json theme={null}
{
"mcpServers": {
"Framelink_Figma_MCP": {
"command": "npx",
"args": ["-y", "figma-developer-mcp", "--figma-api-key=YOUR-KEY", "--stdio"]
}
}
}
```
Add this to your Roo Code MCP configuration file. See the [Roo Code MCP docs](https://docs.roocode.com/features/mcp/using-mcp-in-roo) for more info.
```json theme={null}
{
"mcpServers": {
"Framelink_Figma_MCP": {
"command": "npx",
"args": ["-y", "figma-developer-mcp", "--figma-api-key=YOUR-KEY", "--stdio"]
}
}
}
```
Edit your Rovo Dev CLI MCP config:
```bash theme={null}
acli rovodev mcp
```
Then add the following:
```json theme={null}
{
"mcpServers": {
"Framelink_Figma_MCP": {
"command": "npx",
"args": ["-y", "figma-developer-mcp", "--figma-api-key=YOUR-KEY", "--stdio"]
}
}
}
```
Add this to your Visual Studio MCP configuration. See the [Visual Studio MCP docs](https://learn.microsoft.com/visualstudio/ide/mcp-servers?view=vs-2022) for more info.
```json theme={null}
{
"mcp": {
"servers": {
"Framelink_Figma_MCP": {
"type": "stdio",
"command": "npx",
"args": ["-y", "figma-developer-mcp", "--figma-api-key=YOUR-KEY", "--stdio"]
}
}
}
}
```
1. Navigate to **Settings** → **AI** → **Manage MCP servers**.
2. Click the **+ Add** button.
3. Paste the configuration:
```json theme={null}
{
"Framelink_Figma_MCP": {
"command": "npx",
"args": ["-y", "figma-developer-mcp", "--figma-api-key=YOUR-KEY", "--stdio"],
"env": {},
"working_directory": null,
"start_on_launch": true
}
}
```
4. Click **Save**.
See the [Warp MCP docs](https://docs.warp.dev/knowledge-and-collaboration/mcp#adding-an-mcp-server) for more info.
Add this to your Windsurf MCP config file. See the [Windsurf MCP docs](https://docs.windsurf.com/windsurf/cascade/mcp) for more info.
```json theme={null}
{
"mcpServers": {
"Framelink_Figma_MCP": {
"command": "npx",
"args": ["-y", "figma-developer-mcp", "--figma-api-key=YOUR-KEY", "--stdio"]
}
}
}
```
Add this to your Zed `settings.json`. See the [Zed Context Server docs](https://zed.dev/docs/assistant/context-servers) for more info.
```json theme={null}
{
"context_servers": {
"Framelink_Figma_MCP": {
"source": "custom",
"command": "npx",
"args": ["-y", "figma-developer-mcp", "--figma-api-key=YOUR-KEY", "--stdio"]
}
}
}
```
1. Go to the Zencoder menu (**...**).
2. Select **Agent tools**.
3. Click **Add custom MCP**.
4. Add the name and configuration:
```json theme={null}
{
"command": "npx",
"args": ["-y", "figma-developer-mcp", "--figma-api-key=YOUR-KEY", "--stdio"]
}
```
5. Click **Install**.
Not listed? Most MCP clients take the same JSON. Check your editor's docs, or [join our Discord](https://discord.gg/MeE3UEjdGN).
### Windows, Bun, and Deno
On Windows, `npx` is a batch file (`npx.cmd`) and cannot be run directly by most MCP clients. Use `cmd` to run `npx` instead. In the JSON configuration above, replace `"command": "npx"` with `"command": "cmd"` and add `"/c", "npx",` to the beginning of the `args` array:
```json theme={null}
{
"mcpServers": {
"Framelink_Figma_MCP": {
"command": "cmd",
"args": ["/c", "npx", "-y", "figma-developer-mcp", "--figma-api-key=YOUR-KEY", "--stdio"]
}
}
}
```
If you prefer an alternative runtime to Node.js, you can use Bun or Deno to run the MCP server. Use these in place of the `npx` command in your editor's config above.
**Bun**
```json theme={null}
{
"mcpServers": {
"Framelink_Figma_MCP": {
"command": "bunx",
"args": ["-y", "figma-developer-mcp", "--figma-api-key=YOUR-KEY", "--stdio"]
}
}
}
```
**Deno**
```json theme={null}
{
"mcpServers": {
"Framelink_Figma_MCP": {
"command": "deno",
"args": [
"run",
"--allow-env",
"--allow-net",
"npm:figma-developer-mcp",
"--figma-api-key=YOUR-KEY",
"--stdio"
]
}
}
}
```
## Implement your first design
After configuring your IDE, you'll be able to pull complete design data from any Figma file.
The MCP server compresses the data it receives from the Figma API by almost 90%. Even still, complex designs can overwhelm AI agents with too much information.
You can try to get your editor to implement a whole design for you, but for the most consistent results, work on one section at a time.
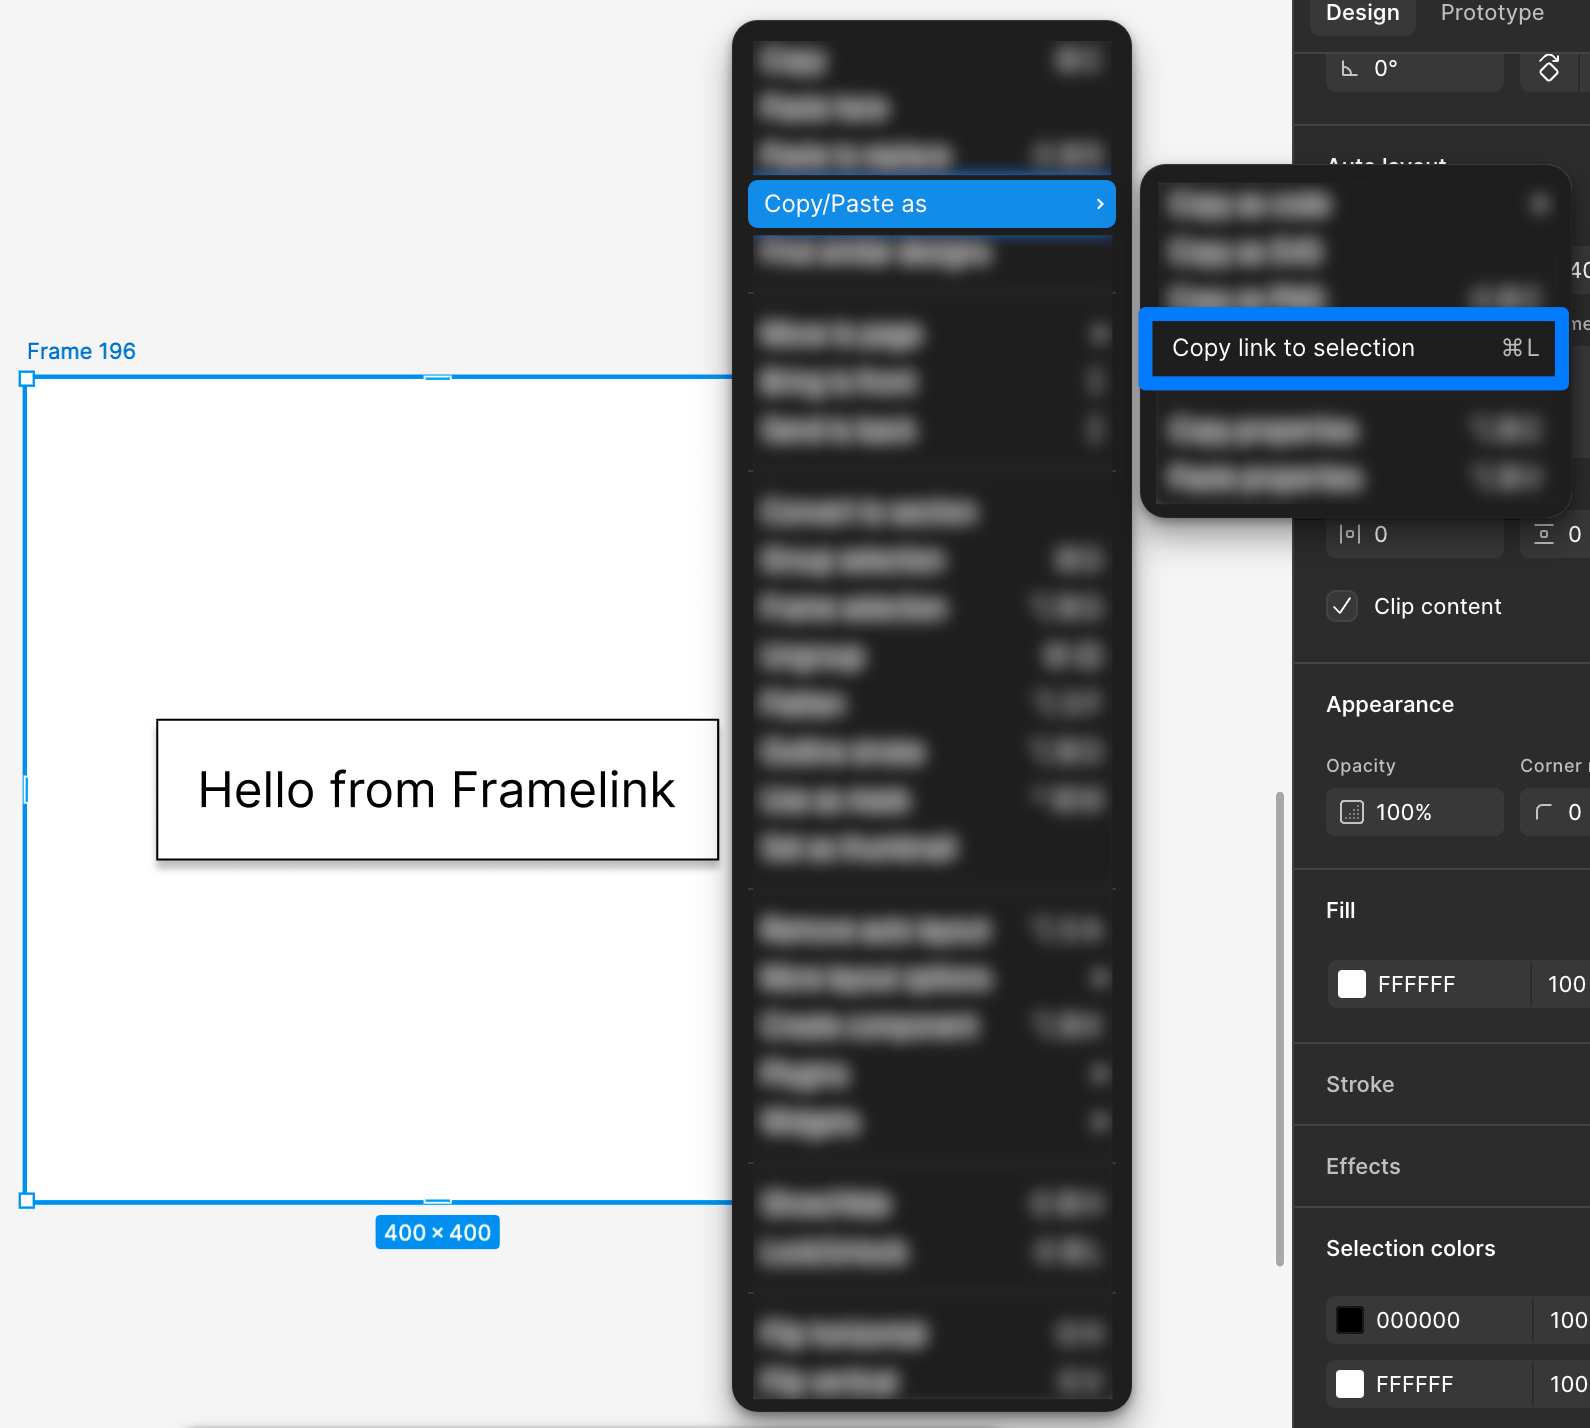
To do that, **right click on the frame or group you'd like to implement, then select Copy/Paste as and choose Copy link to selection.**
 Once you have a link to the Figma frame or group, you can make a request to your editor's AI agent.
A request as simple as "Implement this Figma frame" along with the link should be enough to get the agent to call the MCP's `get_figma_data` function, but [more context is often helpful in getting the best results](/best-practices).
Once you have a link to the Figma frame or group, you can make a request to your editor's AI agent.
A request as simple as "Implement this Figma frame" along with the link should be enough to get the agent to call the MCP's `get_figma_data` function, but [more context is often helpful in getting the best results](/best-practices).
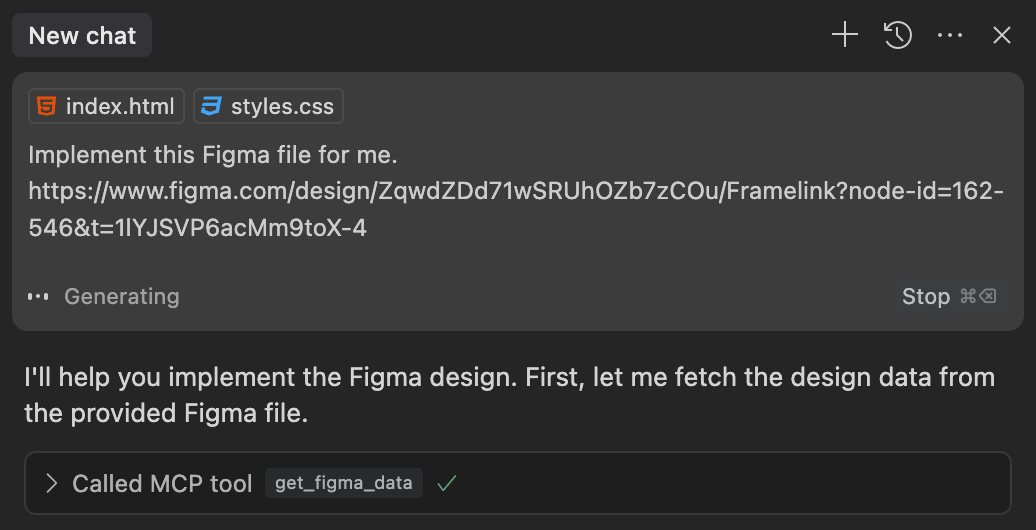 After submitting your request, your coding agent will get to work. It should call the MCP's `get_figma_data` function with the link you provided. Using the information returned from this function, your agent will generate a design.
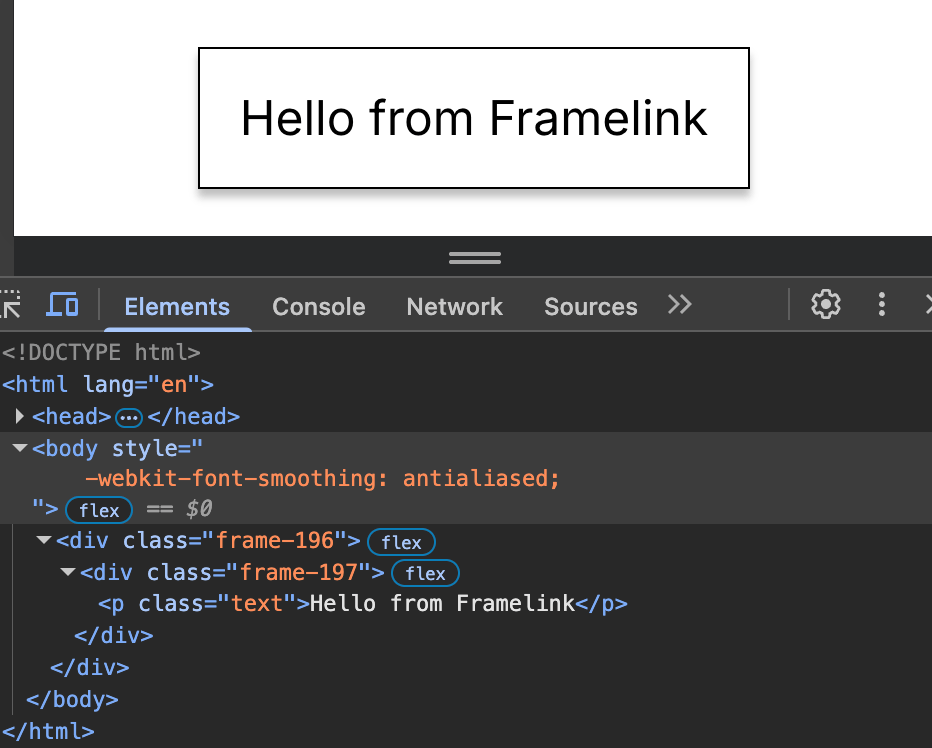
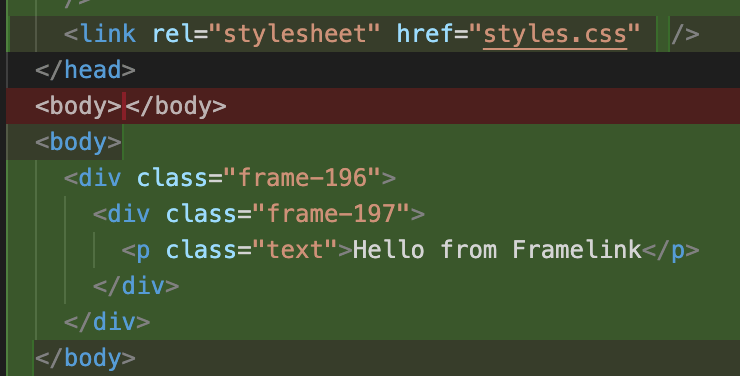 As you can see above, the agent decided to name the classes `frame-###` since the Figma frames used in this example used Figma's default naming. Since this was a very simple design without much context about the intended use of the element, the agent just went with a literal interpretation of the frame's contents.
The design, however, is complete and functional.
As you can see above, the agent decided to name the classes `frame-###` since the Figma frames used in this example used Figma's default naming. Since this was a very simple design without much context about the intended use of the element, the agent just went with a literal interpretation of the frame's contents.
The design, however, is complete and functional.
 ## Troubleshooting
There are some common issues you might run into when connecting to Figma. See the [troubleshooting guide](/troubleshooting) for more information.
## Next steps
This MCP is simple but powerful in the right hands.
If you're ready to take your prompting skills to the next level, check out the [best practices](/best-practices) guide to learn how to use the MCP to its full potential.
This documentation is built and hosted on [Mintlify](https://mintlify.com), a developer documentation platform.
## Troubleshooting
There are some common issues you might run into when connecting to Figma. See the [troubleshooting guide](/troubleshooting) for more information.
## Next steps
This MCP is simple but powerful in the right hands.
If you're ready to take your prompting skills to the next level, check out the [best practices](/best-practices) guide to learn how to use the MCP to its full potential.
This documentation is built and hosted on [Mintlify](https://mintlify.com), a developer documentation platform.